Pasang Speedy
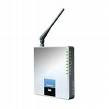
ntuk pemasangan speedy Perangkat yang diperlukan pelanggan : 1. Modem ADSL
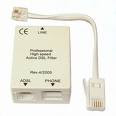
2. Splitter / Micro filter
3. PC(Personal Computer) atau Notebook
. 500MHz processor, 128 MB RAM dan dilengkapi aplikasi multimedia dan ethernet card/ metwork interface card (NIC).
. Sistem operasi Windows ME/2000/XP, Linux, Mac OS, Solaris.
4. Aksesoris LAN, seperti hub, switch, router bagi pelanggan korporasi bila akan
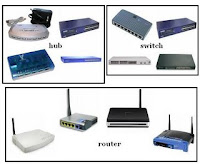
digunakan
untuk jaringan komputer lokal.
Setting_Modem_Speedy
Adsl Modem SMC
Default IP: 192.168.2.1
Default password: smcadmin
Setting Bridge
1. Click WAN
2. Clik ATM PVC
3. Click VC1
4. Protocol: 1483 Bridging, VLAN: Default, VPI/VCI: 8/81, Encapsulation: LLC, Qos Class: UBR, PCR/SCR/MBS: 4000/4000/10
5. Click Save Settings
https://blogger.googleusercontent.com/img/b/R29vZ2xl/AVvXsEgukVGDt8RiS3_3JpMe_HkaJiLRhPaI37he8O05Isr8JzQag6WxBlrag6gwXmAiF7je2tFCmEWGRe_Rkl1QNtmiluDuQ92_u0H9u7OKdHm4HowWwT9YmF647CW0QdMzGJtmBBAL9LwOgd66/s1600-h/image002.jpg
Setting PPPoE
1. Click WAN
2. Click ATM PVC
3. Click VC1
4. Protocol: PPPoE, VPI/VCI: 8/81, Encapsulation: LLC, QoS Class: UBR, PCR/SCR/MBS: 4000/4000/10, IP assigned by ISP: Yes, IP Address: 0.0.0.0, Subnet Mask: 0.0.0.0, Connect Type: Always Connected, Idle Time (Minute): 5, Username: (nmrspeedy@telkom.net), Password: (password From Provider), Confirm Password: , MTU: 1492
5. Save Settings
—-
Adsl Modem ZyXeL
P-660R
Default IP: 192.168.1.1
Default username : admin
Default password : 1234
Setting Bridge
1. choose Network
2. choose WAN
3. Mode: Bridge, Encapsulation: RFC 1483, Multiplexing: LLC, VPI: 8, VCI: 81, Apply
4. choose Maintenance
5. choose Tools
6. Restart
Setting PPPoE
1. choose Network
2. choose WAN
3. Mode: Routing, Encapsulation: PPPoE, Username: (nmrspeedy@telkom.net), Password: (password speedy), Service Name: Speedy, Multiplexing: LLC, VPI: 8, VCI: 81, IP Address: Obtain an IP Address Automatically, Connection: Nailed-Up Connnection, Apply
4. click Maintenance
5. click Tools
6. Restart
—
Adsl Modem Shiro
Default IP: 192.168.1.1
Default username : admin
Default password : admin
Setting Bridge
1. Click Advanced
2. Click WAN
3. Click New Connection
4. Connection Name: Speedy, Type: Bridge, VPI: 8, VCI: 81, and Submit
5. Save Settings
6. Restart Router
https://blogger.googleusercontent.com/img/b/R29vZ2xl/AVvXsEh5mmCOJmdkdZYYdoQwgcfdqAhijbVDAnzWQTL2fYmiWBj_jW45CMkrnHMC2s6ZQmqHoTXeuHx0pbjP1G2Ttj-D85tgSHXO7q61MKMSh3rEsM73VpvAm8eT6MFZhyXyoEyywz54dVdbSnC1/s400/image002.jpg
Setting PPPoE
1. Pilih Advanced
2. Pilih WAN
3. Klik New Connection
4. Connection Name: Speedy, Type: PPPoE, Sharing: Enable, Encapsulation: LLC, Username: (nmrspeedy@telkom.net), Password: (password from provider), VPI: 8, VCI: 81, and Submit
5. Save Settings
6. Restart Router
https://blogger.googleusercontent.com/img/b/R29vZ2xl/AVvXsEgSGTPl9uirwkKjD1RD4qy4_M0-OjuQfuldzeyR3B5RIHkWDQhyY8h_dbDTJqHrBxTatJLuTrUP9usXaiYgNx0gWB4KB7Wuthsgxm-Y1VmC66hBlCprfCUpxNUYEWuhn72BpwCPlItM9Llc/s400/image001.png
—
Adsl Modem Aztech
Aztech
Default IP: 192.168.1.1
Default username : admin
Default password : admin
Setting Bridge
1. Click Advanced
2. Click WAN
3. Click New Connection
4. Connection Name: Speedy, Type: Bridge, VPI: 8, VCI: 81, and Submit.
5. Save Settings
6. Restart Router
Setting PPPoE/Router
1. Click Advanced
2. Click WAN
3. Click New Connection
4. Connection Name: Speedy, Type: PPPoE, Sharing: Enable, Encapsulation: LLC, Username: (nmrspeedy@telkom.net), Password: (password from provider), VPI: 8, VCI: 81, and Submit.
5. Save Settings
6. Restart Router
—
Adsl Modem TECOM
AR1031
Default ip: 192.168.1.1
Default username : admin
Default password : admin
Setting Bridge
1. Click Advanced Setup
2. Click WAN
3. Click Edit
4. ATM PVC Configuration, VPI=8; VCI=81, Service Category: UBR Without PCR, Next
5. Connection Type Bridging, Encapsulation Mode LLC/SNAP-BRIDGING, Next
6. Cheklist Enable Bridge Service, Service Name: Speedy, Next
7. WAN Setup - Summary, Save
8. Save/Reboot
https://blogger.googleusercontent.com/img/b/R29vZ2xl/AVvXsEiHjrW_xPD44-I26NOUKjbRqxfDMTB9E_PVPwKNZRcFPZjfkSXdDTKazf5crmCoStYeDb9rTp9_9oFYQnSuT3Qa1oDsie17M9VZr_WcKWhvvZjUDKM8Ov8VyqI4l-Xr9iUGywGCRhFi0lvn/s320/image002.jpg
Setting PPPoE
1. Click Advanced Setup
2. Click WAN
3. Click Edit
4. ATM PVC Configuration, VPI=8; VCI=81, Service Category: UBR Without PCR, Next
5. Connection Type PPP over Ethernet (PPPoE), Encapsulation Mode LLC/SNAP-BRIDGING, Next
6. Put your PPP Username: (nmrspeedy@telkom.net); PPP Password: (password from Provider); PPPoE Service Name: Speedy, Next
7. Cheklist Enable WAN Service, Service Name: Speedy, Next
8. WAN Setup - Summary, Save
9. Save/Reboot
https://blogger.googleusercontent.com/img/b/R29vZ2xl/AVvXsEiOm_Ou2eB7UJL0dTddroe29fTlPiOR9KCkH3x9X0i957ksFqD7jX7GwGdA5jpt7oXaksux6XoG-2I-HxK4hPMR3Mt6bDqlWOvOcI3mckQIK9m9GV3NngIU7C4NX-l0GtWhAy9Js4r4hRR2/s320/image002.jpg
—
Adsl Modem Billion
1.Login To : http ://192.168.1.254
2.User name = admin
Password = password
Click -> OK
3.Click : Quick Start
4.Edit Connection :
Encapsulation = PPPoE LLC
Bridge = Enabled
Setting VPI = 8 dan VCI = 81 , and Than
Static IP Setting
IP Address = 0.0.0.0
subnet mask = 0.0.0.0
Gateway = 0.0.0.0
5.Click : - Submit
- SAVE CONFIG
6.Click : Submit
7.Wait Till process Configuration done !
8.Configuration Done !
—
Modem Prolink
1.Login To -> http :// 10.0.0.2
User Name : admin
Password : password
Click . . . . OK
2.Chose Configurasi WAN :
3.Select Adapter : Pilih Pvc3 (Indonesia)
4.Edit Field :
Bridge = Enable
Encapsulation = 1483 Bridge IP LLC
ATM VPI = 8
ATM VCI = 81
https://blogger.googleusercontent.com/img/b/R29vZ2xl/AVvXsEhSwP4gOz37o454y-bjPhV96xkLiPRLkFwlQ8da0dSu0UrKF4VrLKMVr5hKgMukN0_3FW1lMTrTPyL0wTWgw1TSZL4hvLDYpDs5Nn4Sj00jSWD6U3gi17xvzg1TpOQT-XviBf5FQ1B-vH1z/s320/image002.jpg
5.Static IP Setting : “ just blank “
IP Address = just empty
Subnet Mask = just empty
Gateway = just empty
User Name = username@telkom.com . . . . . . ( optional ) **
Password = xxxxxxxx . . . . . . . . . . . . . . . . .( optional ) **
**If you choose to put username & password there just double clik explorer
**If you not choose to put username & password there you have to create new connection at Network Connection
6.Create New Connection (Bridge) See here..>>
7.Than Next :
* Click Submit
* Click Save Configuration
Next : Save Reboot ….
—
Adsl Modem D-Link
D-Link
DSL-302T
Default IP: 192.168.1.1
Default username : admin
Default password : admin
Setting Bridge
1. Click Setup
2. Click Connection
3. Bridge Connection Setup. Name: Speedy; Type: Bridge; Encapsulation: LLC; VPI=8; VCI=81, Apply
4. Click Tools
5. Click System Commands, Save All, Restart
https://blogger.googleusercontent.com/img/b/R29vZ2xl/AVvXsEjUisOVgbPAYHXJVglYFMm5Qwtp7-6rko3lB_qrXVILY2C2zxf8rLfs5NGBolJJJWW9XgZvKWXO4oLA_AXdYk8M8vzQVGJOmZ6xDQASwKizjJMEH9vw4KGB_gk06EBHTPdZj_lQM5JcAuom/s400/image001.png
Setting PPPoE/Router
1. Click Setup
2. Click Connection
3. Bridge Connection Setup. Name: Speedy; Type: PPPoE; Username: (nmrspeedy@telkom.net); Password: (password from provider); VPI=8; VCI=81, Apply
4. Click Tools
5. Click System Commands. Save All, Restart
https://blogger.googleusercontent.com/img/b/R29vZ2xl/AVvXsEh7SGhU5Gz05JsUmlvVB9eYg0HTj1KNlkiHrpbUaSyBAi9mbLE-vbqKw2_FYR44GNlAIC4ndpHYHcmkQqzG4lY3HIwcZcpipCs_C1gAkivGphyphenhyphendowSQQWaiv2NkGGCBNtKDebIg2kTw_dIC/s400/image001.png
—
adsl Modem Repotec
1. open Internet
Explorer ketik : http://192.168.1.1
2. Username : admin & Password : epicrouter
3. Click : OK
class=”MsoNormal”>Click WAN
1. Pic Adapter : Pvc0
2. Click Submit
1.Virtual Circuit = Enabled
2. Bridge & IGMP = Disabled
3a.
Each region was different from another region and for Bandung vpi :8 , vci : 81
3c.Service Category = UBR without PCR
3d.Protocol/Conection type = PPPoE
3e.Encapsulation = LLC/Snap-Bridging
4. Put Username & Password from your provider
5. and Than click Submit.
6. click Save Configuration
(wait till Saving configuration done.)
7. put DNS : 202.134.0.155 & 202.134.2.5
—
Adsl Modem Dareglobal
Default IP: 192.168.1.1
Default username : admin
Default password : admin
Setting Bridge
1. Click Advanced Setup
2. Click WAN
3. Find VPI/VCI: 8/81, Click Edit
4. ATM PVC Configuration, VPI=8; VCI=81, Service Category: UBR Without PCR, Next
5. Connection Type Bridging, Encapsulation Mode LLC/SNAP-BRIDGING, Next
6. Cheklist Enable Bridge Service, Service Name: Speedy, Next
7. WAN Setup - Summary, Save
8. Save/Reboot
Setting PPPoE
1. Click Advanced Setup
2. Click WAN
3. Cari VPI/VCI: 8/81, Click Edit
4. ATM PVC Configuration, VPI=8; VCI=81, Service Category: UBR Without PCR, Next
5. Connection Type PPP over Ethernet (PPPoE), Encapsulation Mode LLC/SNAP-BRIDGING, Next
6. Put your PPP Username: (Nomorspeedy@telkom.net); PPP Password: (Password from provider); PPPoE Service Name: Speedy, Next
7. Centang Enable WAN Service, Service Name: Speedy, Next
8. WAN Setup - Summary, Save
9. Save/Reboot
—
Adsl Modem TP-Link
Default IP: 192.168.1.1
Default username : admin
Default password : admin
Setting Bridge
1. click Advanced Setup
2. click WAN
3. Find VPI/VCI: 8/81, click Edit
4. ATM PVC Configuration, VPI=8; VCI=81, Service Category: UBR Without PCR, Next
5. Connection Type Bridging, Encapsulation Mode LLC/SNAP-BRIDGING, Next
6. Cheklist Enable Bridge Service, Service Name: Speedy, Next
7. WAN Setup - Summary, Save
8. Save/Reboot
https://blogger.googleusercontent.com/img/b/R29vZ2xl/AVvXsEg5yQ42Lzkg_gRETW5-mZeKPRe_5bzT8JKHVxasFpxbjX-8PruywTq5l3IXgFBZW9FIvdIa-G1qmQ03jJ8WzfPvrkW5cmo4SJlGKFh6VUldvQ7jH9IlPawgnfFdt-D12Dk5X-6OQTVguWqs/s320/image002.jpg
Setting PPPoE
1. click Advanced Setup
2. click WAN
3. find VPI/VCI: 8/81, click Edit
4. ATM PVC Configuration, VPI=8; VCI=81, Service Category: UBR Without PCR, Next
5. Connection Type PPP over Ethernet (PPPoE), Encapsulation Mode LLC/SNAP-BRIDGING, Next
6. Put your PPP Username: (nmrspeedy@telkom.net); PPP Password: (password from provider); PPPoE Service Name: Speedy, Next
7. Cheklist Enable WAN Service, Service Name: Speedy, Next
8. WAN Setup - Summary, Save
9. Save/Reboot
—
Adsl Modem Shiro
Default IP: 192.168.1.1
Default username : admin
Default password : admin
Setting Bridge
1. Click Advanced
2. Click WAN
3. Click New Connection
4. Connection Name: Speedy, Type: Bridge, VPI: 8, VCI: 81, and Submit
5. Save Settings
6. Restart Router
https://blogger.googleusercontent.com/img/b/R29vZ2xl/AVvXsEh5mmCOJmdkdZYYdoQwgcfdqAhijbVDAnzWQTL2fYmiWBj_jW45CMkrnHMC2s6ZQmqHoTXeuHx0pbjP1G2Ttj-D85tgSHXO7q61MKMSh3rEsM73VpvAm8eT6MFZhyXyoEyywz54dVdbSnC1/s400/image002.jpg
Setting PPPoE
1. Pilih Advanced
2. Pilih WAN
3. Klik New Connection
4. Connection Name: Speedy, Type: PPPoE, Sharing: Enable, Encapsulation: LLC, Username: (nmrspeedy@telkom.net), Password: (password from provider), VPI: 8, VCI: 81, and Submit
5. Save Settings
6. Restart Router
https://blogger.googleusercontent.com/img/b/R29vZ2xl/AVvXsEgSGTPl9uirwkKjD1RD4qy4_M0-OjuQfuldzeyR3B5RIHkWDQhyY8h_dbDTJqHrBxTatJLuTrUP9usXaiYgNx0gWB4KB7Wuthsgxm-Y1VmC66hBlCprfCUpxNUYEWuhn72BpwCPlItM9Llc/s1600-h/image001.png
—
Setting Modem Articonet ACN-100R dan ACN-110
https://blogger.googleusercontent.com/img/b/R29vZ2xl/AVvXsEjstmizjuGQg3HoXbsFVaZXTFWO3iwZORCOhFcjTgOzBKNU7zCcyfML5JyaeIheHJpBsqvixlORb-D8Ik_Mpu21VofVF-lJJBGfrmY5XUK4fLEQPacQUyMMgRvbYD283HbRi-t70slBZCjf/s1600-h/articonet100r_copy.jpg
Cara melakukan setting di komputer untuk akses ke modem Articonet.
Untuk setting di komputer dilakukan sesuai dengan operating system yang dipakai di komputer pelanggan, disini yang dibahas khusus untuk Windows XP.
Lakukan network setting di PC (komputer) sbb :
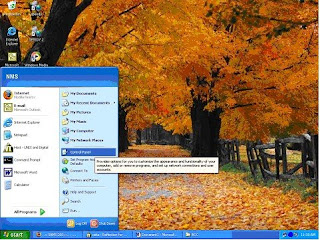
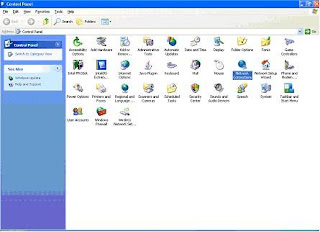
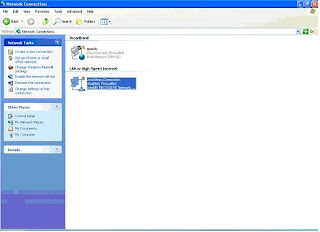
a. Start – Control Panel – Network Connection
b. arahkan kursor pada Local Area Connection yang aktif, kemudian klik kanan dan pilih properties
c. kemudian pilih menu Internet Protocol (TCP/IP) dan klik 2X, maka akan muncul menu General.
d. Pilih Obtain an IP Address Automatically kemudian pilih Obtain DNS server address automatically, kemudian tekan tombol OK.
Panduan cara setting modem ADSL Speedy koneksi PPPoE.(PPPoE)
Setting modem dilakukan melalui browser dengan mengakses alamat http://192.168.1.1
Masukkan username dan password : admin/admin
Setelah masuk ke menu setting lakukan langkah berikut :
Masuk ke menu “Advanced Setup” kemudian pilih “WAN” dan klik tombol “Edit” disebelah kanan tabel WAN Masukkan nilai PVC Configuration : (masukkan nilainya sesuai wilayah TELKOM masing-masing daerah)
VPI = X
VCI = XX
Service Category = UBR Without PCR, kemudian klik tombol Next
Connection type = PPPoE
Encapsulation = LLC, kemudian klik tombol Next
Masukkan username dan password Speedy, kemudian klik tombol Next
Tandai atau kasih v untuk pilihan “Enable WAN Service”, kemudian klik Next dan klik tombol Save
Setting PPPoE untuk koneksi Speedy telah selesai dilakukan
Selanjutnya klik tombol Save/Reboot
(Modem akan reboot -/+1 menit dan tunggu sampai modem normal kembali)
Berikut langkah setting modem ADSL Articonet untuk Dial-Up/Bridge.
Setting modem dilakukan melalui browser dengan mengakses alamat http://192.168.1.1
Masukkan username dan password : admin/admin
Setelah masuk ke menu setting lakukan langkah berikut :
Masuk ke menu “Advanced Setup” kemudian pilih “WAN” dan klik tombol “Edit” Masukkan nilai PVC Configuration : (masukkan nilainya sesuai wilayah TELKOM masing-masing daerah)
VPI = X
VCI = XX
Service Category = UBR Without PCR, kemudian klik tombol Next
Connection type = Bridging
Encapsulation = LLC, kemudian klik tombol Next
Tandai atau kasih v untuk pilihan “Enable Bridge Service”, kemudian klik Next dan klik tombol Save
Setting Bridge untuk koneksi Speedy telah selesai dilakukan
Selanjutnya klik tombol Save/Reboot
(Modem akan reboot -/+1 menit dan tunggu sampai modem normal kembali)
Setting modem Articonet untuk koneksi Bridging sudah selesai, langkah berikutnya setting koneksi Dial-Up di PC/komputer.
Panduan instalasi Dial Up koneksi ADSL menggunakan Windows 2000:
1. Klik Start, klik Setting,klik Control Panel,
2. Klik Network and Dial Up Connections.
3. Klik Make New Connection, klik Next,
4. Klik Dial Up to the Internet
5. Klik I want to setup my internet manually, klik Next
6. Klik I connect through a phone line and a modem klik Next
7. Pilih dan klik modem ADSL yang sesuai
8. Isi username : 15xxxxxxxxxx@telkom.net
9. Password : xxxxxxxx
10. Klik OK dan Lanjutkan sesuai perintah yang muncul
11. Klik Finish
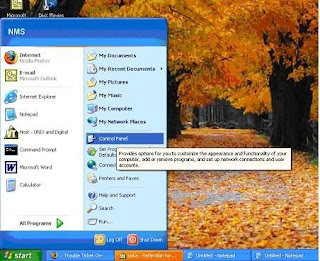
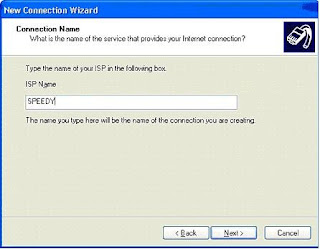
Panduan installasi Dial Up koneksi ADSL menggunakan Windows Xp:
1. Klik Start, Control Panel, Network Connections.
2. Klik New Connection Wizard.
3. Klik Connect to the Internet, klik Next.
4. Klik Setup my connection manually, klik Next
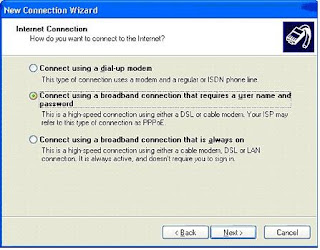
5. Klik Connect using a broadband connection that requires a user name and password, klik Next.
6. Isi ISP Name “TelkomSpeedy”, klik Next
7. Isi username : 15xxxxxxxxxx@telkom.net dan Password : *******
8. Confirm password : xxxxxxxx
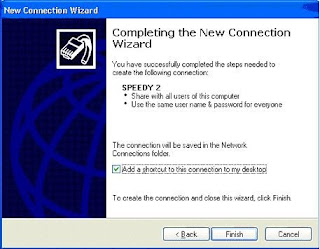
9. Kemudian beri tanda v(centang) pada pilihan “Add a shortcut to the desktop screen”
10. Klik Finish
Error_koneksi_dial_Speedy
remplaza_fecha(’5:53 AM’);
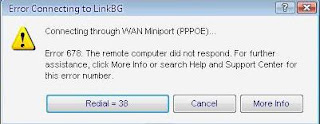
Error 678
Follow this steps :
Step 1: Turn On Modem ADSL
1.See adsl modem ON (Not blinking) before you dial
Step 2 : Reset winsock TCP/IP
1.Click start -> Click Run -> tipe netsh winsock reset and than enter
2.When command prompt window up again, restart computer
3.Try ping to Modem and Try connection diaol again.
Step 3: setting Modem adsl
1.Login to Gateway Modem via Browser exp: 192.168.1.1
Pic : VPI : 8 / VCI : 81 (for Bandung)
- Encapsulation : LLC
- Type Koneksi : Bridge
2 . If Not Work try to Reset you Modem and setting adsl Ruter again.
remplaza_fecha(’5:56 AM’);
ERROR 769
Chek LAN computer:
1. Click start menu
2. Click Control Panel
3. Click Network Connection
- Click Local Area Connection
- - -> Click Right and than ENABLE.
remplaza_fecha(’8:41 AM’);
ERROR 619/691
Try Create New Connection at computer :
1.Click start menu
2.Click Control Panel
3.Click Network Connection
 4. Click ‘create a new connectio ->NEXT
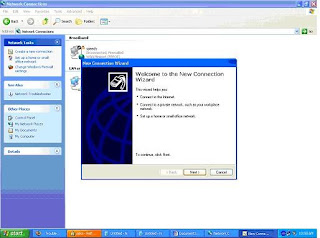
5. Clcik connect to the internet àNEXT
 6.Click setup my connection manually ->NEXT
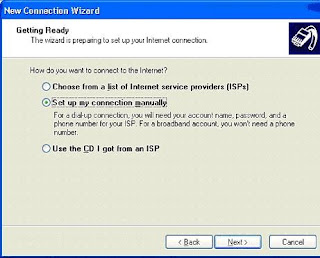
7. Click connect using a broadband connection that requires a username and password -> NEXT
8.ISP Name:speedy -> NEXT
9.Username:1311XXXXXX@telkom.net
Password:XXXXXXX -> NEXT
10.Check list Add a shortcut to this connection to my dekstop.
11.Click Finish.
12.Click icon speedy at dekstop 13.Click connect
remplaza_fecha(’3:06 PM’);
This can be resolved by following these steps:
· Restart your computer and wait until all applications have completely loaded before trying to reconnect.
· If your problem has still not been resolved uninstall and reinstall your Broadband modem. For information on how to do this please refer to the ADSL modem setup instructions or the installation cd that was provided with your modem
remplaza_fecha(’3:09 PM’);
Usually this is a one-off glitch which happens when the Connection Progress is interrupted by the user or another program on the PC. In order to resolve this:
· Restart your computer and wait until all applications have completely loaded before trying to reconnect.
remplaza_fecha(’3:11 PM’);
This error can be best remedied by: · A restart of your computer tends to resolve 50% of cases with this error message · Disable any Firewall Software and try to connect again… · Try uninstalling and reinstalling the Modem. For information on how to do this please refer to the ADSL modem setup instructions or the installation cd that was provided with your modem.
remplaza_fecha(’3:12 PM’);
Error 645 - Internal Authentication Error
This problem tends to occur when using Windows 98 or Windows ME. This can be resolved by following these steps:
· Try uninstalling and reinstalling the Modem. For information on how to do this please refer to the ADSL modem setup instructions or the installation cd that was provided with your modem.
· Windows 95/98 - This error can occur if the ‘Require encrypted password’ option is enabled on the ‘Server Types’ tab in the connection’s properties, or an incorrect user name or password have been entered. See MS KB Article Q199780
· All versions of Windows - This error can occur if you are attempting to connect to a Windows 2000 domain that has had a RRAS (Routing and Remote Access Services) server log on without administrative privileges. See MS KB Article 227747
remplaza_fecha(’3:15 PM’);
This error usually occurs with Windows 2000 when the Internet connection has become corrupted. This can be resolved by following these steps:
· Try uninstalling and reinstalling the Modem. For information on how to do this please refer to the ADSL modem setup instructions or the installation cd that was provided with your modem.
remplaza_fecha(’3:19 PM’);
This error usually means there is a problem receiving the Broadband signal at your modem. An error 680 / 619 would usually also mean you do not have a solid green ADSL light on the modem. This can be resolved by following these steps:
Ensure you have checked the following:
· Does your telephone Work? (if not you may have a fault with your telephone line)
· Is the cable from the modem to the filter secure at each end?
· Are you using a home-made extension line? Broadband requires a solid copper (round) extension.
Error 680 and both modem lights are solid green
If the modem installation seems successful and you have two solid green lights on your modem but are still receiving the error message- 680: No dial tone, then:
· If you have an internal 56k modem please disable the modem as follows
o Right click on the My Computer Icon on your desktop and then select Properties
o If you have a Device Manager tab along the top select this, otherwise select the Hardware tab along the top and then click on the Device Manager button
o In the Device Manager click on the + sign on the Modem selection and then…
o Identify and right click your modem icon and select Disable / Properties and then Disable in this Hardware Profile
o After you have completed this, close down the Device Manager and then restart your computer and try to reconnect to the Broadband connection.
remplaza_fecha(’3:21 PM’);
This can be resolved by following these steps: · Restart your computer and wait until all applications have completely loaded before trying to reconnect. If your problem has still not been resolved uninstall and reinstall your Broadband modem. For information on how to do this please refer to the ADSL modem setup instructions or the installation cd that was provided with your modem
PC / Computer / Laptop Harus selalu di update antivirsu dan di scan • Cek computer from virus and spyware (with installing at computer).• example Antivirus software :– Avg free antivirus : http://free.grisoft.com– Avira antivirus : http://www.avira.com– Avast Antivirus : http://www.avast.com• Example AntiSpyware Software :– Microsoft Antispyware : http://www.Microsoft.com/OneCare– Spyware Doctor : http://www.pctools.com/spyware-doctor– Ad-aware : http://www.lavasoftusa.com• Diatas adalah beberapa Link antivirus yang bisa anda gunakan